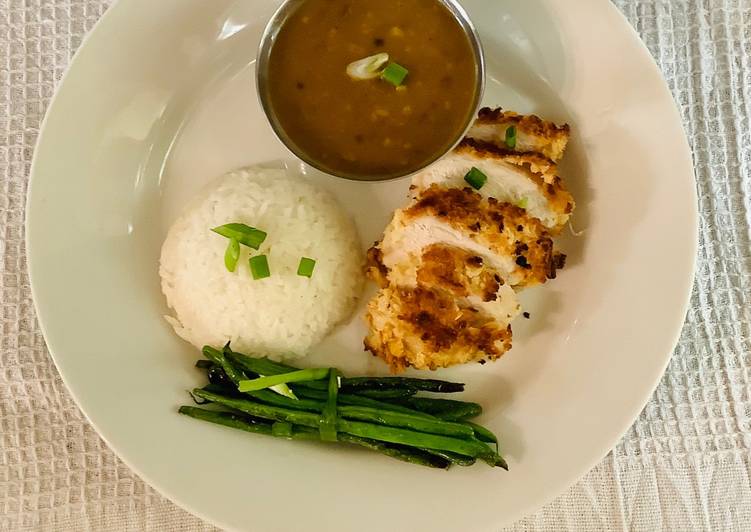
Chicken katsu served with jasmine sticky rice, curry sauce and green beans.😋. Season the chicken breasts on both sides with salt and pepper. Stir before serving with the chicken. The chicken and rice are fine but the sauce is completely tasteless and bland.
 It didn't taste bad, but that's because it didn't. Katsu is a Japanese method of breadcrumbing chicken- this version is served with a rich curry sauce, from BBC Good Food. Great served with some rice and soya beans with finely sliced red chilli. You can cook Chicken katsu served with jasmine sticky rice, curry sauce and green beans.😋 using 22 ingredients and 13 steps. Here is how you achieve that.
Ingredients of Chicken katsu served with jasmine sticky rice, curry sauce and green beans.😋
- You need 2 of chicken breast.
- Prepare 3 tbsp of seasoned plain flour.
- You need 1 of egg.
- It's 5 tbsp of panko breadcrumb.
- It's 3 tbsp of oil.
- It's of For curry sauce.
- You need 1/2 of fine diced onion.
- Prepare 1 tbsp of brown sugar.
- You need 1 tbsp of fresh garlic.
- You need 1 tbsp of sou sauce.
- It's 1/2 tsp of honey.
- You need to taste of Salt.
- It's 1 tbsp of curry powder.
- You need 500 ml of chicken stock.
- You need 1 tbsp of oil.
- It's 2 tbsp of plain flour.
- It's 1/2 tsp of garam masala.
- It's of For Sticky Rice.
- You need 150 g of jasmine rice.
- It's 300 ml of water.
- You need to taste of Salt.
- You need 1 tbsp of butter or oil.
Chicken katsu curry is so simple to make at home. Chicken Katsu Curry is an absolute favourite - traditionally hailing from Japan, this dish compromises of panko breadcrumb coated chicken in a thick curry sauce and rice. Serve with rice, chicken and the sauce. Per Serving Enjoy rich and flavorful Japanese curry served with chicken katsu or tonkatsu over rice.
Chicken katsu served with jasmine sticky rice, curry sauce and green beans.😋 instructions
- In the pot, heat up some oil. Add onions and cook it for 2-3 mins. Once the onions are cooked add brown sugar for onions to get carmalised..
- Add garlic and cook it for further one minute. Add curry powder. Stir it well. Add plain flour and beat it together with the spatula..
- Add chicken stock bit by bit until it become smooth, silky texture and lumps free. Add honey and soy sauce. Mix it together. At the last, add garam masala. Serve it into the gravy boat..
- For Sticky Rice:.
- Wash the rice 3-4 times under cold running water. In the pot, heat up some oil. Add washed rice and water. Add little salt to taste. Let it simmer for 15 mins. Turn the gas off, put the lid on and let it cook with the steam..
- For Chicken Katsu:.
- Tenderise the chicken lightly. Season it well with salt and pepper..
- In three different bowls, add plain flour, eggs and panko breadcrumb..
- Take the chicken breast, dust it with the flour, shake off any excess flour. Then dip in to the eggs mixture and then coat it with the breadcrumb. Repeat the same process with the rest of the chicken breast..
- Heat up some oil and shallow fry the chicken on both sides for 2 mins each. Transfer the chicken in to the hot oven on 175 degree for 20-25 mins..
- Make sure check the temperature of the chicken once it reaches above 75 degree means the chicken is cooked..
- Serve it in the serving dish along with the rice, green beans and curry sauce..
- Garnish with sliced spring onions and enjoy..
The crunchy texture with creamy sauce is simply irresistible. Watch How to Make Baked Tonkatsu. Tender and juicy pork loin wrapped in a crispy golden panko crust, serve with tonkatsu sauce and ground. Katsu curries served at restaurants often do not have anything in the sauce. Katsu Curry - Great Pre-made Dish.
https://cookpad.com/us/recipes/13476482-chicken-katsu-served-with-jasmine-sticky-rice-curry-sauce-and-green-beans%F0%9F%98%8B
Comments
Post a Comment